
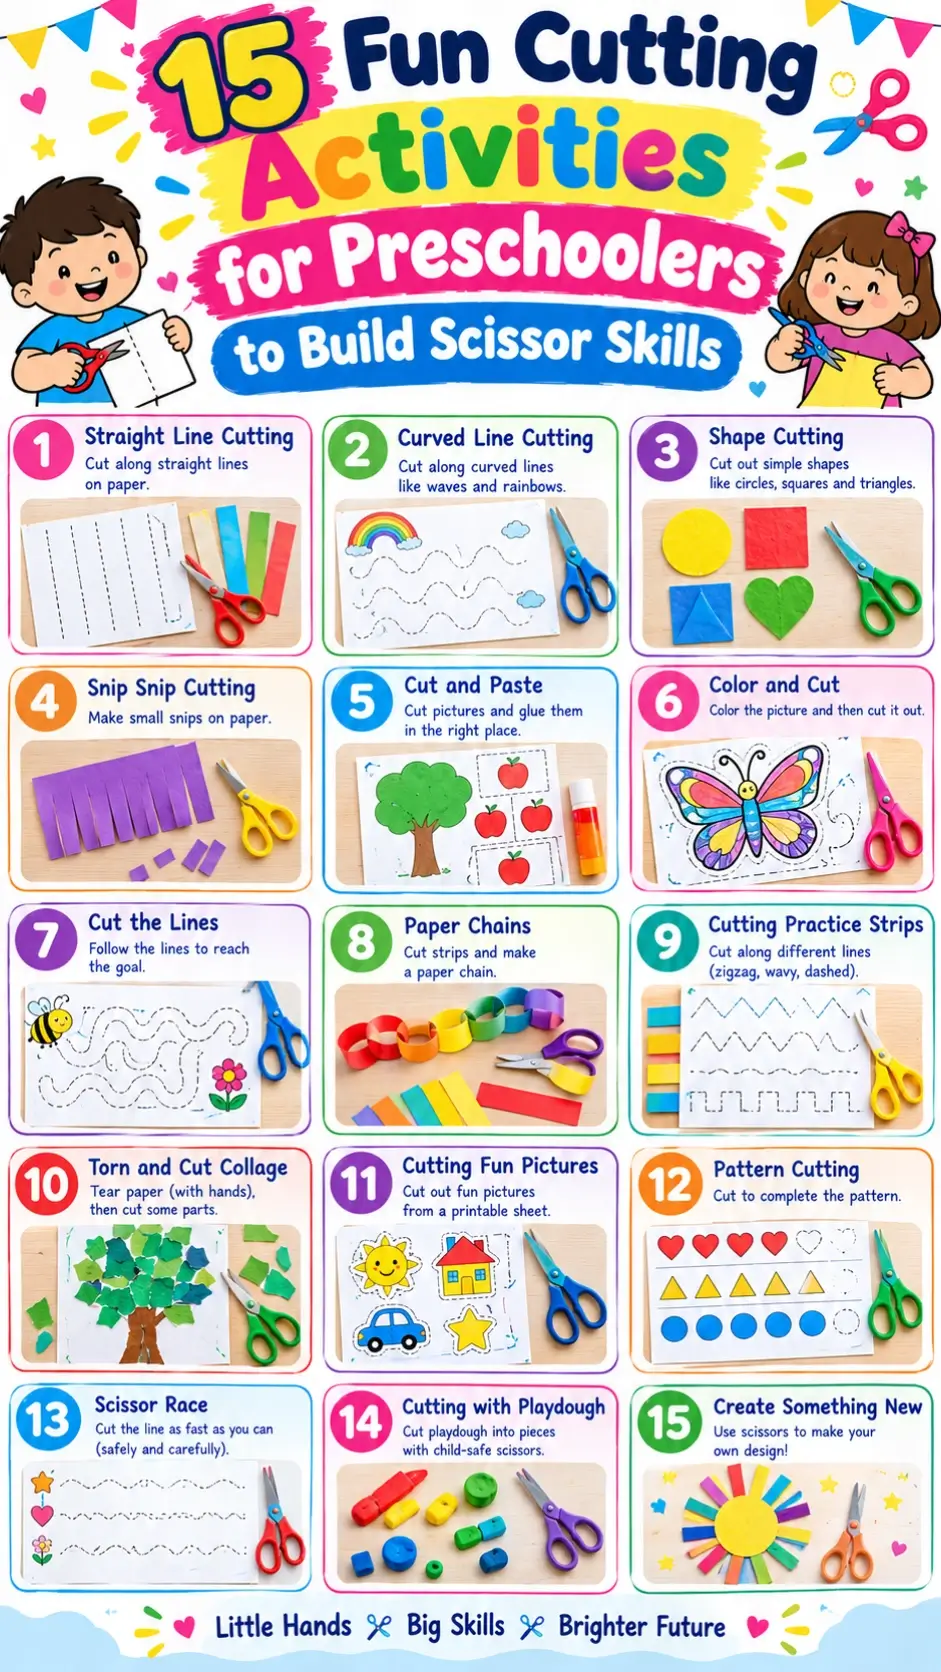
Cutting with scissors takes more work than it looks.
A preschooler has to hold the scissors, open and close the blades, follow the cutting path, hold the paper with the other hand, and move it at the right time. That’s a lot for little hands to manage at once.
The good news is that children can learn these skills through short, playful activities.
I’ve put together 15 cutting activities for preschoolers, from simple snipping to lines, fringes, crafts, and basic shapes. You can use paper, playdough, yarn, leaves, index cards, and a few things you probably already have at home.
And you don’t need a long lesson. Five or 10 minutes of focused practice can be plenty.
What are scissor skills?
Scissor skills are the hand and coordination skills a child uses to hold, open, close, and control scissors while cutting.
A child needs to coordinate several things at once:
- Finger and hand movement
- Fine motor control
- Hand-eye coordination
- Wrist and arm stability
- Bilateral coordination
- Visual attention
- Control of the paper
- Safe use of scissors
Cutting is also a bilateral coordination activity because each hand has a different job. One hand operates the scissors while the other holds and turns the paper. Occupational therapy guidance describes this as a “doing hand” and a “stabilising hand.”
That second hand matters.
If your child keeps dropping the paper, turns the whole body to follow the line, or tries to use both hands on the scissors, they may simply need more practice with these separate jobs.
When should preschoolers start using scissors?
Children can begin learning basic scissor skills around age 3, although readiness varies from child to child. Some children show interest earlier, while others need more time with pre-scissor activities first.
A common progression looks like this:
- Tear paper
- Build hand strength
- Learn the correct scissor grip
- Practice opening and closing
- Make small snips
- Cut forward
- Cut straight lines
- Cut curved and wavy lines
- Cut simple shapes
- Cut more detailed shapes
Around age 3, a child may begin snipping forward along a line. Around age 4, many children can work on straight and curved lines, while more complex shapes usually come later. These are general milestones, not a test your child has to pass.
15 cutting activities for preschoolers
1. Snip the paper strips
Cut several strips of paper about 1 to 2 inches wide.
Draw short marks across the strips. Your child cuts each mark to create little pieces.
This is one of the best first scissor activities for toddlers and younger preschoolers because each cut is short. Your child gets the satisfying feeling of making a real cut without having to control a long path.
You can make the strips different colors and talk about the colors as you work.
2. Playdough cutting
Roll playdough into several thick “snakes.”
Give your child scissors and let them cut the playdough into pieces.
This works well for beginners because the playdough stays in place better than paper. Your child can concentrate on opening and closing the scissors before worrying about staying on a line.
Occupational therapy resources commonly suggest cutting playdough or modelling clay as an early scissor activity.
And yes, kids usually love this one.
3. Fringe cutting
Take a rectangular piece of colored paper.
Draw short vertical lines along one edge. Your child cuts along each line to make a fringe.
You can turn the finished paper into grass, a lion’s mane, a monster’s hair, or a silly wig for a paper character.
Fringe cutting gives beginners a clear stopping point for every snip. It also works well as a bridge between random snipping and cutting along lines.
4. Straight-line road
Draw several wide roads across a sheet of paper.
Make some roads short and others longer. Put a little car, animal, or character at the end of each road.
Your preschooler cuts along the road to help the character reach the destination.
Start with thick straight lines. When your child becomes comfortable, make the roads narrower.
This is fine motor control cutting practice with a simple story attached to it.
5. Zigzag mountain trail
Draw a large zigzag path across a piece of paper.
Tell your child the scissors need to travel over the mountain trail.
Use wide, gentle zigzags at first. Sharp corners require more control, so there’s no need to make the path complicated right away.
You can turn the finished strips into a collage afterward.
6. Wavy ocean cutting
Draw long, smooth waves across blue paper.
Ask your child to cut along the waves.
Wavy lines are harder than straight lines because your child has to adjust the direction of the paper while continuing to cut.
This is where hand-eye coordination becomes very noticeable. Your child’s eyes follow the path while the hands keep the scissors and paper working together. Curved and wavy cutting generally requires more coordination than straight-line cutting.
7. Yarn cutting sensory bin
Fill a shallow tray with short pieces of thick yarn in different colors.
Give your child scissors and let them cut longer pieces into shorter pieces.
You can add a simple challenge: “Can you make 5 short red pieces?”
Keep the yarn pieces manageable and supervise closely. The texture also gives your child a different cutting experience from ordinary paper.
8. Nature cutting tray
Go outside and collect safe, dry materials such as soft leaves, thin grass, or small flower stems.
Place them on a tray and let your child cut selected pieces with child-safe scissors.
Talk about what they found.
“Is this leaf bigger or smaller?”
“Which one is green?”
“Can you cut this stem once?”
This can turn into a little nature lesson while your child works on scissor control. Avoid thick, woody stems or anything sharp, and stay with your child throughout the activity.
You can extend the theme with Where Does Food Grow preschool activities when you’re ready for more plant-related learning.
9. Index card cutting maze
Draw a simple maze on an index card.
Use thick lines and wide paths for a beginner. Your child cuts along the path from the starting point to the finish.
Index cards are small enough to stay manageable in little hands.
For a child who struggles with a full sheet of paper, a smaller piece can make the task easier because there is less paper to hold and control. Occupational therapy guidance also suggests smaller pieces of paper when children have difficulty managing larger sheets.
10. Cut and paste animal faces
Draw or print a few large animal parts on separate pieces of paper: ears, eyes, noses, tails, and simple body shapes.
Your child cuts out the pieces and glues them together to make an animal.
The cutting is the main practice, while the pasting gives the activity a clear purpose.
You can make a polar bear, penguin, seal, or other simple animal and then connect it to your Arctic animals activities for preschoolers.
11. Paper chain countdown
Cut colored paper into strips.
Your child cuts along the lines, then you help them connect the strips into a paper chain.
You could make a 5-day countdown to a family outing or a weekend activity.
For younger children, pre-draw the cutting lines. Older preschoolers can help measure and mark the strips.
This activity gives cutting a real purpose, which can make repeated practice much more interesting.
12. Shape cutting cards
Draw large circles, squares, triangles, and simple ovals on thick paper or index cards.
Let your child cut around each shape.
Start with a circle or square with thick outlines. Once your child gets comfortable, add shapes with more corners.
Shape cutting should come after your child has had plenty of practice with snipping and lines. Occupational therapy resources commonly place simple shapes after straight and curved-line cutting in the progression.
You can use the finished shapes for a collage or connect this activity with shape recognition activities for preschoolers.
13. Cutting a paper plate fringe
Take a paper plate and draw short lines around the outside edge.
Your child cuts along the lines to create a fringe.
The finished plate can become a sun, lion, flower, or silly monster.
This is a fun fringe cutting craft because the child gets a visible result from all those little cuts. NHS occupational therapy guidance also uses cutting around the edge of a paper plate as a scissor practice idea.
14. Cut the food for the pretend kitchen
Draw simple fruits and vegetables on colored paper.
Your child cuts them out, then uses the paper pieces in a pretend kitchen.
“Can you cut the carrot?”
“Let’s put the apple in the bowl.”
“Can we make a paper salad?”
This pairs nicely with preschool cooking activities because your child gets to move from pretend food preparation into other kitchen-themed learning.
15. Scissor skill collage
Give your child a large sheet of paper and several small pieces of colored paper.
Ask them to use different cutting styles:
- Straight cuts
- Zigzag cuts
- Wavy cuts
- Fringe cuts
- Small snips
- Simple shapes
Then glue the pieces onto the page to make a picture.
Your child gets to choose where the pieces go, so the final collage can be completely different every time.
You can make an animal, a house, a garden, or an abstract picture. Let the child decide.
Scissor grip progression for preschoolers
A good scissor grip develops gradually.
At first, your child may put several fingers into the handle, hold the scissors awkwardly, or use their whole arm to make the cutting motion.
That’s normal during the learning stage.
For a typical pair of children’s scissors, teach the thumb-up position. The thumb points upward while the fingers help control the lower handle. Occupational therapy guidance recommends teaching children to use the thumb, index finger, and middle finger while the other fingers remain relatively stable.
You can use this simple progression:
Step 1: Hold the scissors correctly.
Step 2: Open and close the scissors.
Step 3: Make small snips.
Step 4: Cut forward through paper.
Step 5: Follow straight lines.
Step 6: Follow curves and waves.
Step 7: Cut simple shapes.
Step 8: Cut more detailed shapes.
Your child doesn’t have to move through these stages quickly. Give them enough repetition at each stage.
Hand strength exercises for kids before cutting
Some preschoolers struggle with scissors because their hands aren’t ready for the repeated squeezing motion.
You can build hand strength through play.
Try:
- Squeezing a sponge in water
- Pinching playdough
- Using kitchen tongs
- Pulling apart playdough
- Using a child-safe hole punch
- Opening and closing clothespins
- Using a medicine dropper with water
- Tearing paper
- Building with interlocking blocks
These activities work different parts of hand control that children also use when cutting. NHS occupational therapy guidance recommends squeezing, tong activities, playdough, paper tearing, threading, and similar hand tasks as preparation for scissor use.
You can also see my guide to fine motor activities for preschoolers for more hand-based activities.
Bilateral coordination activities before scissors
Cutting asks the hands to do different jobs at the same time.
So it helps to give your child other activities with the same basic idea.
Try:
- Opening a jar while holding the jar
- Tearing paper with both hands
- Holding paper while drawing
- Threading large beads
- Rolling playdough with both hands
- Holding a bowl while stirring
- Opening a zipper bag
- Building with interlocking blocks
The goal is for one hand to stabilize something while the other hand works on it. This is the same basic pattern your child uses when one hand cuts and the other moves the paper.
First scissor activities for toddlers
If your child is just starting, skip complicated worksheets for now.
Give them a short strip of paper.
Let them practice opening and closing the scissors. Then make a few small snips.
Once that feels comfortable, try cutting across a narrow strip.
Playdough is another good starting material because your child can make a single snip without having to guide the scissors along a line.
And keep the activity short.
A child who makes 5 careful snips and stops happily has had a useful practice session.
Shape cutting worksheets for toddlers
Shape worksheets can be useful once your child has basic scissor control.
Start with large, simple shapes:
- Circle
- Square
- Triangle
- Oval
Use thick cutting lines at first.
A thick line is easier to see and easier to follow than a thin outline. As your child gains control, you can gradually make the shapes smaller or the lines narrower. Occupational therapy guidance recommends moving from thick lines toward narrower lines as cutting control improves.
If you’re making a free printable scissor practice PDF for your child, keep the first pages simple. One or two large paths on a page are enough.
You can later add:
- Straight lines
- Zigzags
- Waves
- Spirals
- Simple shapes
- Large pictures
Don’t pack 20 cutting paths onto one page. Preschoolers don’t need that much visual clutter.
How to make a fine motor bin with scissors
A fine motor bin can give you several short activities in one place.
Use a shallow tray or box and add:
- Child-safe scissors
- Paper strips
- Index cards
- Thick yarn
- Playdough
- Scrap paper
- Large stickers
- Glue stick
- A small bowl for cut pieces
You can change the materials every few days.
For example, one day the bin might be a yarn-cutting station. Another day, you could add paper strips and animal pictures.
Keep scissors inside the bin only when you’re supervising the activity.
Cutting activities for 3-year-olds
At 3, focus on the first stages of scissor skills.
Good choices include:
- Snipping paper strips
- Cutting playdough
- Fringe cutting
- Short straight lines
- Simple paper tearing
- Cutting short pieces of yarn with close supervision
Don’t worry if your child can’t cut a perfect line.
The aim is to learn how the scissors work and begin coordinating the two hands.
For more age-appropriate activities, see my guide to preschool learning activities for 3-year-olds.
Cutting activities for 4-year-olds
Four-year-olds can usually work toward longer straight lines, curves, and simple shapes.
Try:
- Zigzag paths
- Wavy lines
- Index card mazes
- Large circles
- Squares
- Animal cut-and-paste crafts
- Paper plate fringes
You can also connect cutting to early literacy. Let your child cut out large letters and glue them onto a page after working on alphabet activities for preschoolers.
For more ideas, see preschool learning activities for 4-year-olds.
Cutting activities for 5-year-olds
At 5, many children are ready for more detailed cutting.
You can try:
- Simple picture outlines
- Triangles and stars
- Animal shapes
- Curved paths
- Cutting several connected shapes
- Cut-and-paste scenes
- Magazine picture collages
You can also add a little academic work.
Have your child cut out number cards for a game connected to number recognition activities for preschoolers, or cut picture cards for beginning sound activities for preschoolers.
My preschool learning activities for 5-year-olds guide has more activities for this age.
How I practice cutting with Hafsa
With Hafsa, I’d keep cutting practice tied to something she already wants to do.
If we’re making an animal picture, she can cut the pieces. If we’re doing a pretend food activity, she can cut paper fruits and vegetables. If she wants to make a craft, I can draw the cutting lines and let her take over.
I also wouldn’t correct every little movement.
If she cuts beside the line, that’s okay. I’ll help her slow down and show her how to move the paper with the other hand when she needs to change direction.
That second-hand movement takes practice.
And when she’s had enough, we’re done. There’s always another day.
Safety tips for preschool cutting activities
Always stay with your child when scissors are being used.
A few simple rules help:
- Use scissors made for children.
- Choose scissors that fit your child’s hand.
- Teach “thumbs up” when holding scissors.
- Keep the blades pointed away from the body.
- Teach children to carry scissors closed.
- Use age-appropriate materials.
- Supervise closely around yarn and other small pieces.
- Avoid sharp household scissors.
- Give left-handed children scissors designed for their dominant hand when appropriate.
The right scissor size matters because children need to control the handles and blades. Occupational therapy guidance also recommends suitable scissors, good sitting posture, and adult supervision while children are learning.
What if my preschooler can’t use scissors yet?
Give them more preparation time.
Some children need extra work on hand strength, finger separation, hand-eye coordination, or bilateral coordination before cutting becomes comfortable.
Try playdough, tearing paper, tongs, squeezing games, threading, and other two-hand activities for a while.
Then come back to scissors.
If your child has persistent difficulty using both hands together, can’t manage age-appropriate scissor tasks, avoids using one hand, or seems to lose a skill they previously had, speak with your child’s pediatrician or an occupational therapist. Occupational therapy can help identify the specific skill that’s making cutting difficult.
Cutting activities can connect with other preschool learning
Once your child can handle scissors, you can use cutting in many different learning activities.
For example, they can cut picture cards for counting activities for preschoolers or cut objects for which has more preschool activities.
They can cut paper shapes before doing math activities for preschoolers, or make simple paper pieces for simple addition activities for preschoolers.
You can even make a small craft around subtraction activities for preschoolers by having your child remove paper objects from a picture.
For language practice, cut pictures for fun rhyming activities for preschoolers or make simple character pieces for Who Am I preschool activities.
The same idea works with themed learning. Try paper props for Where the Wild Things Are preschool activities or paper animal pieces for Where Do Animals Live preschool activities.
If your child likes patterns, cutting colored strips can also lead naturally into pattern activities for preschoolers.
A simple 5-day scissor practice plan
You can keep the week very simple.
Monday: Snip paper strips.
Tuesday: Cut playdough snakes.
Wednesday: Cut straight and zigzag lines.
Thursday: Make a paper plate fringe.
Friday: Cut a large circle or square and use it in a craft.
Each session can be around 5 to 10 minutes.
Your child doesn’t have to complete every activity. Follow their attention and hand control.
You can find more general ideas in my guide to the best educational activities for preschoolers and my guide on how many hours a preschooler should study.
Frequently asked questions
What are the best cutting activities for preschoolers?
Start with paper snipping, playdough cutting, fringe cutting, and short straight lines. Once your child has more control, add zigzags, waves, simple shapes, and cut-and-paste crafts.
How do I teach a 3-year-old to use scissors?
Start by teaching your child how to hold the scissors and open and close the blades. Then give them narrow paper strips for short snips before introducing straight lines.
What age should a child start using scissors?
Many children begin learning basic scissor skills around age 3. Readiness varies, so look at your child’s hand strength, coordination, interest, and ability to follow simple safety instructions.
What are scissor skills for preschoolers?
Scissor skills include holding scissors correctly, opening and closing them, making snips, cutting forward, following lines, and eventually cutting out shapes.
Why is cutting good for fine motor skills?
Cutting requires controlled finger and hand movements. It also works hand-eye coordination, hand strength, wrist control, and the ability to use both hands together.
What is bilateral coordination in cutting?
Bilateral coordination means using both sides of the body together. During cutting, one hand operates the scissors while the other holds and moves the paper.
What should I do if my child has trouble holding scissors?
Try smaller pieces of paper, thicker paper, short snipping activities, and playdough cutting. You can also work on hand-strength activities such as squeezing, pinching, tong play, and tearing paper. If the difficulty continues, an occupational therapist can assess the specific problem.
Are cutting worksheets good for preschoolers?
Yes. Cutting worksheets can give children repeated practice with lines and shapes. Use them alongside real cutting activities such as playdough snipping, paper crafts, and fringe cutting.
How long should a preschool cutting activity last?
Start with about 5 to 10 minutes. Some children will stay interested longer, while others will be finished after a few minutes. Short, regular practice is enough.
Final thought
Scissor practice gets easier when you give your child small steps.
Start with a few snips. Then try a straight line. Add a zigzag, a wave, a simple shape, and eventually a little craft.
Your preschooler doesn’t need perfect cutting today.
They need time to practice using one hand for the scissors and the other hand for the paper. The rest comes with repetition.
https://www.twinkl.com/blog/preschool-cutting-activities
https://keiki.app/blog/cutting-activities-for-preschoolers
https://childrenslighthouse.com/jubilee/growing-together/fun-cutting-activities-for-preschoolers?page=1
https://pocketofpreschool.com/scissor-skills-activities-and-free-cutting-printables/